Tuesday, May 5, 2009

Vertical Engine Dilemma

Many of us have lawnmowers from yesteryear that just sit in the back and rot. You have either to throw it away, or do something useful with it.

Invariably the mower deck is thrashed, the transmission is a little weak, but the engine is strong. The cost to refurbish the tractor to usefulness is just ridiculous, so you just hide it out back and have illusions of grandure of making a go kart out of it some day.

Quite honestly, using many of the components is a really good idea, but you will run into some snags. On most sites they will tell you to just take a walk when it comes to using vertical engines, but as you have seen on our site, we are not afraid of Vertical Engines, in fact they can be used, and with ghusto.

I do however have a dilemma. The dilemma is providing the market with a fully built vertical engine drives system. This would cut a lot of the leg work out of the fabrication and thinking process for the vertical engine drive system.

As we discuss in our Vertical Engine Drives 202 course some thinking is required for at least the final drive ratios. With this kit, or system, all the figuring would be done, all you would have to do is bolt it in place and go.

I personally think it is a good idea, considering the fact that most engines cost around 300 dollars. Where are you going to pick up a horizontal engine for a mear 300 bucks? If you could purchase a vertical engine drive system for less than the engine you would be money ahead.

So if you would do me a favor and fill in this vertical engine drives survey, then I could
  • Determine how to design it
  • What to have included in it,
  • Most importantly if you would even be interested in it!


Wednesday, April 15, 2009

What Is Wrong With My Go Kart? The Engine Runs But It Doesn’t Move.

“I have this go kart and it suddenly doesn’t work. The engine works fine, the clutch appears to be mounted correctly, but the go kart does not move. What is wrong with it?”

Typically a clutch does not suddenly stop working…but in my recollection, yes they do.

Unless you are looking for the symptoms, you will not catch what happens to centrifugal clutches.

What occurs is that over a period of time the clutch actually starts to fall “shear itself” apart. This happens typically if the clutch is not mounted to the engine tightly. The slop between the engine and the clutch will impart shock loads into the clutch causing the driver to shear apart.

The weight slinger is a pressed metal plate with tangs in it. The tangs correspond to teeth on the clutch driver. Typically the pressed metal plate is actually harder material than the clutch driver, so the tangs on the driver become sheared.

As is the case in the clutch that pictured here, the tangs are on their
last legs. What occurs is that the tangs become sheared off completely, and the engine will free wheel and the clutch will not transmit the load. (This particular clutch was getting ready to fail...fortunately I caught the problem and replaced it.)

To fix this, a new clutch is required. I have welded some in the past, but I would not recommend that seeing the clutch really is on its last legs.

The front side for example is really getting pounded as well. The teeth on the sprocket and the bell housing are getting ready to let go.


The reasons for these failures is two fold:

- Sloppy clutch mounting to the engine shaft

- Heavy loads being driven and the clutch slipping quite often (shock loads during engagement occur, which impact into the teeth of the sprocket and the bell interface.

So yes, the clutch will suddenly stop working, I remember how frustrated I was when I discovered this a couple years back.

Bottom line: check the clutch and see if it is broken.


Thursday, March 26, 2009

Go Kart Drive Line Problems: How Do I Match Up A Clutch?

One of the biggest problems people run into when making a go kart is figuring out the drive line.

I get emails that are asking me how to match up the clutch to the go kart, because the clutch is smoking.

Invariably what the problem is, is not the clutch, but the gear ratio.

A classic example is a go kart with 12 inch wheels being driven by a 8.5 inch drive sprocket.

The problem that occurs is that the demands of the go kart drive line require a steeper drive to engine ratio. The smaller 8.5 inch drive sprocket is requiring a ton of force in chain tension to get the go kart moving.

To get around this the ratio must be made steeper, and the way to do that is to increase the main drive sprocket size.

Example:

  • 5 hp @3600 Briggs and Stratton 4 Cycle Engine (Torque Level is: 88 in-lbs)
  • 325 lb go kart
  • 12 inch diameter rear tire
  • Drive Sprocket Diameter = 1.5 inch
  • Driven Sprocket Diameter = 8.5 inches
  • Approximate Acceleration on level ground is 8.56 ft/s^2
  • Pushing force is 85 lbs
(These calculations came off of the gokartguru engineering tool kit calculations page)

Now compare the same go kart with a larger drive sprocket

  • Driven Sprocket Diameter = 11.89 inches
  • Approximate Acceleration on level ground is 11.89 ft/s^2
  • Pushing force is 120 lbs

Nothing has changed on the engine, just the ratio in the rear sprocket to the engine has changed causing the go kart to accelerate faster and have 35 lbs more pushing capacity.

As a rule of thumb for every angle of hill climb multiply .017 times the weight of your cart to determine the amount of force required to push your go kart up the hill. So if your go kart weighs 325 pounds the force required to get the gokart up a 20 degree incline is 110 lbs. That is just to get it to the balance point.

Your drive system must put out over 120+ lbs to get the gokart up the hill.

As you can see the standard drive line is not going to be able to get that go kart up the hill, it is only putting out 85 lbs.

The bigger sprocket, however, would get the gokart up the hill. There is a problem though: the main drive sprocket is the same size as the wheel. So an alternate sprocket system is going to be required to get the go kart to go up hills.

As a rule of thumb for larger wheeled, one ratio go karts, the sprocket needs to be almost as large as the rear wheels, other wise you will have clutch slippage problems.

(Again this is a rule of thumb, you may be able to get a clutch that works better under the loading conditions, but the corresponding engine output has to be matched as well.)

Typical centrifugal clutches that you buy at the hardware store are not designed for prolonged engagement, and have significant slippage when encountering torque limits.

For example the 5 horsepower engine above puts out 88 in-lbs of torque. When the level of horsepower output is maxed out on the engine it will lug below the engagement limit on the clutch and just sit there and slip.

To overcome this, the horsepower needs to be increased and correspondingly the rpm increased to cause the clutch engagement to be more aggressive, seeing that the clutch engagement curve for a clutch is related to the square of the rpm.

Next time we will discuss what to do when you can’t find a sprocket that is going to work, and you just have run out of options…or have you?

Visit the GoKartGuru driveline calculations course for a more in depth discussion about drive lines for go karts.

Friday, March 13, 2009

Cheap Go Karts: I have no money, but plenty of time

Build cheap go carts over the weekend!

Many of us are in the same boat: no money, plenty of junk, plenty of time: how can I make a go kart out of this junk?


For the first timers, keep it simple: a straight forward gravity powered gokart.


Hours and hours of fun can be had with a wood stick dragger gokart.

The nice thing about it is that there is no mess, no noise, and no fixing. And it is clean and green!

First to start we need to think safety.


Brakes are very important. A drag stick, no not like the one in the little rascals where the brake just falls off and they are at full tilt down suicide hill and begin a treacherous escapade down the side walk, through fences, across gardens, and under people! No the brakes have gotta work so that the freight train can stop.


So first on the list is think of a brake that is gonna work. A drag stick on the ground works okay, for a simple go kart. Keep it under 10 mph and you should be okay.


Next drive it in an unobstructed area, like a clear drive way, you don’t want to drive under cars, or fences and bushes.


Now lets get to the nuts and bolts of the building the cheap go kart.


The cheap go kart frame consists of 2x4’s that are nailed together. It resembles an " I " when looked at from the top.


There are two areas to the frame, the steering section and the rear section. The steering section is a 2x4 put on its side and then pivoted in the mid section with a nice big bolt. Don’t think of using a nail, it will work until you hit a bump and then get ripped off, and then you will go flying. No use a bolt, you may have to find one at the hardware store.


The rear section of the wood go kart is similar to the front, but it is held square or rigid to the center “keel”structure.
The easiest way to keep it square is to take a nice flat board 36 wide by 24 tall by 3/8ths thick and tack it on to the keel and the rear axel board.

Now to attach the wheels. The easiest way to attach go kart wheel is to double up the 2x4s or make a sandwhich section of boards. The down side to this is ground clearance, meaning if the tires are small in diameter they may not be able to go past the two by four sandwhich, if that is the case then go to plan B discussed later in the article….

But if you don’t care about ground clearance, then use the sandwich method for both front and back sections.


Then take some lag bolts, or heavy duty wood bolt and thread them first through the go kart wheels then into the boards. Put washers on the bolt heads and washers between the wheel and the axel boards, this will provide spacing needed. Use at least 4-8 washers between the wheel and the boards, depending on how much tire interference there is: just keep adding washers until the clearances are good and the wheel spins freely.


Then for the go kart steering section add a section of rope on each side, and loop it around. Then lay the string in your lap, and walla instant steering rope.


Additionally, you will use the front steering board as a foot rest. You can steer with your feet here.


A word of caution when riding the go kart… small inputs are required for massive steering changes so be aware of this. It takes some getting used too, and inexperie
nced drivers will crash easily. So keep the speeds down, use small or (not steep) hills. And as always, never, never, never, ever, end the ride in the road!

See video below of crashing cheap wood go kart.


The nice thing about the rope is that you can then pull the go kart back up the hill, also you can pull the go kart around too. This is great fun.

Plan B from mounting wheels:

If you do not like the sandwich method, then go to the hardware store and buy a shaft of steel rod that is the same diameter as the wheel axel bearings.


Mount the axel on the board by using metal strap. Pound nails on either side of the shaft on the metal strap to keep the axel down tight. The nice thing about today, versus when I was a kid, is the advent of drywall screws. Wonderful things! Instead of nailing everything together, screw it together, that goes for this strapping section too.


See video below of Fun Kart on the loose!


Mount the wheels on the axels. Drill a hole in the axel and then fit a cotter pin into the hole to retain the wheel. Be sure to put a washer in between the cotter pin and the wheel, otherwise the wheel bearing will eat through the cotter and the wheel will come off.

This go kart can be put together in less than an hour and fun can be generated in less than 30 seconds when complete!
Enjoy, but be safe!

If you want more information visit the Go Kart Guru.

Monday, August 4, 2008

Why Can't I Climb Hills With My Go Kart?

I got a question the other day:

"I have a 6.5 hp Robbin engine on my go cart and I put on a hillman 10 teeth centrifical clutch on it, but I have hills all over my place and it wont pull any hills. What clutch should I change to for more torque? I have a 79 tooth sprocket on my drive shaft."

This is like one of those word problems that we used to get when we were in grade school. Our attraction is to the hp, the number of teeth on the sprockets and so forth, when in reality, those are not the real issue....

Here is my response...

Glad you emailed. You are very correct with your go kart system. Typically the one gear ratios systems are very limited on what they can do other than just drive around parking lots or long driveways.

The ideal clutch for off roading is the variable speed belt clutch, or better known as the comet clutch.

Comet themselves sells them, or Northern Tool and supply sells them.

The installation process may be a little tricky, but there are versions that bolt onto your engine, keeping the trickiness to a minimum.

You may have to route your sprocket on your axel to another location, but other than that it will do just the trick.

Reason why it will is that it gives you ratios of 19:1 for pulling up hills, but then automaticallly switched gears so that the ratios are aproaching 1:1.

The difference is this: you have 10 tooth sprocket with a 79 tooth sprocket on the axel. This is a 7.9:1 ratio. A 7.9:1 ratio can only pull so much, and when you get to a hill, you have reach the balance between clutch slipping and the amount of horsepower that your engine puts out. A larger engine might help, but you might be suprised that you would end up with the same situation, a slippling clutch and no movement up the hill.

When you up the ratio to grandma gear 19:1 then you can crank up those hills no problem. The amount of torque that your engine will put to the wheels is about 2 times more than your Hilman clutch can put out.

The units may be a little pricey $180 to $200 dollars, but the end result is what you want, a more useable go kart rough terrain, or hilly areas.

I have an article that brushes the question....you can find it here....
http://ezinearticles.com/?Go-Kart-Drive-Systems---What-Kind-Do-I-Have?--Do-I-Want?-Will-Work?--(Part-5-of-10)&id=1325307

Tuesday, July 8, 2008

Don't Lose Your Bearings

What ever do I mean, don’t lose your bearings?

Do I think everyone is lost? No not exactly, not even close…

I actually, mean don’t lose your bearings.

Now you may be lost…

What is he talking about?

Let me reintroduce myself: I am the Go Kart Guru. I am a specialist in go kart design, fabrication and development. I help people make high quality homemade go karts. On go karts there are bearings. Bearings on drive shafts, axels, engines, and wheels. Make more sense now?

Back to losing our bearings…

I am specifically addressing here front wheel bearings.

In short there are good bearings and cruddy bearings.

You can literally “lose” your bearings and end up with a just a bearing race and no bearings at all, and a wheel on the ground. Not a good situation to be in.


I just had a reader write in and say he lost his front bearing and needed some advice. That prompted this article.

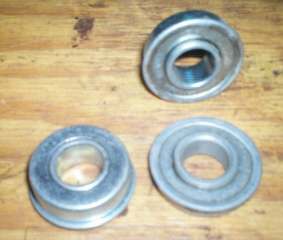
The following bearings are used on light duty applications, such as wheel barrows and hand carts. Unfortunately, you will find them frequently on lighter gocarts.


These bearings are basically a pressed metal shell with a hardened inner race. The outer shell is a thin formed sheet of steel that has little if no strength.

In fact the design of these bearings is for vertical loading, not side loading. The sides of the bearings will blow out with side loading.

These type bearings are not suited for go karts, because they cannot handle the side loading that occurs during cornering. They will last approximately 2 to 3 hours and then you will end up with a wheel coming off.

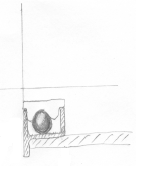
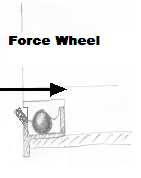
Diagram of Pressed Metal Bearing. The second picture shows a side load on the bearing causing the side to blow out.

The type of bearing that should be used is a flange roller bearing. There are several types:

- Flanged roller bearing with the outer casing machined

- Flanged roller bearing with a snap ring on the outside

The most cost effective version is the snap ring style because all that is required in the machining process is to cut a groove versus taking off a whole chunk of material to make the flange.


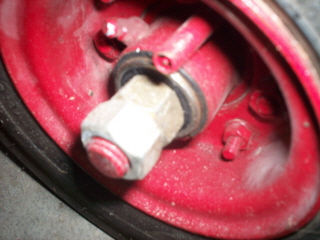
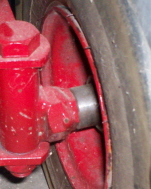
Picture of a "snap ring" flanged bearing. Used on a front wheel. Note the double nuts are designe to keep the nut system from tightening and crushing the bearing system. The other side, is purpose is the opposite, to keep the nuts from unwinding and the wheel falling off!

The downside to using the flange style bearings is that most off the shelf go kart spindles are 3/4ths in diameter (.75 inches).

This is a down side, because the “pressed metal” bearings are designed to run easily on the ¾ spindles. The OD of the “pressed metal” bearing fits easily inside the hub. The reason for this design is that the bearings inside the “pressed metal” style are extremely small and the inside bearing hub needs to be larger to make up the room.

What does that mean for the go karter who wants to use flanged bearings?

The typical flange bearing ID is .625, not .75 inches. The spindles that you get either have to be custom ordered, or buy the ¾ inchers and alter them to be .625 inches.


Picture of a modified "redone" spindel system. If you look real close you will see two bolt heads. The larger head served as a platform to weld the smaller .625 bolt onto.

If you are designing a go kart, keep this in mind that you get the correct spindle sizes, or you may end up “Losing your bearings” and you may actually end up on the trail: lost with no back up.

And one final word of advice: if you do chose to use the “pressed metal bearings” be sure to get at least 4 back ups to start with. At $4 dollars a pop, you may want to just invest in a $9 dollar bearing that will never fail.

GKG


Visit GoKartGuru.com and take advantage of the information that is provided both in video and pdf form….

Thursday, June 26, 2008

Go Kart Ran Into A Brick Wall

Why would I run my go kart into a brick wall? Surely that would be a death defying stunt!

Most defnitely. And most idiotically.

No, I am not talking about running into a brick wall with a go kart, but sometimes when we start these projects we run into "brick walls."

Go Kart projects can be that way. You are going down the nice path of developing this go kart.

You have all the stuff together. You have your ducks in a row, your plan, your engine, some wheels...

Then you run into this impediment, this edifice, this blockage, in your pursuit of the go kart of your dreams.

Most often this blockage starts in two areas:

-Converting a Lawn Mower Engine to Drive a Go Kart
-Converting Rider Lawn Mower Wheels so they work on a gokart

Believe it or not, converting the riding lawn mower wheels is a bit more involved or difficult than the Vertical Engine conversion...

The conundrum, or difficulty comes in actually getting the rear wheels to mate up with a drive shaft.

There are two ways to go here:

1.) Do not use an axel, but make the system a one wheel drive
2.) Use an axel and make the system a live axel

The first option is the easiest and definitely is not a brick wall, but the second option is a brick wall, at least it appears so on the surface...

To look at the problem, the typical axel shaft is 1 inch in diameter (for strength and durability, you do not want a bent shaft)

The hub diameter on a typical riding lawnmower is .750 in diameter.

The trick is getting the axel shaft and the hub on the wheel to mate.

How do you do it? Safely?

Why would I say safely?

Well to get a wheel to stay in place you need a reliable method of retaining it: ie 4 bolts, a single nut on the end of the shaft... something.

If you look at standard gokart axels they have 2 inches of .75 shaft sticking off of them. Unfortunately, the shaft is typically not long enough to extend beyond the hub on a lawnmower wheel.

And additionally, the shaft does not have the vital keyway for grabbing the wheel and actually turning it.

So what do you do?

There is a method which is simple. It requires that you have a welder though. (and NO it is not welding it to the shaft!)

Rule #1 of gokart design: It needs to come apart.

It again is simple enough, basic enough, and safe enough to put on a go kart.

Okay you are killing me, what is it?

Well the Go Kart Guru has run into this problem with his New Go Kart that he is converting from a riding lawnmower. The object is to use as much of the Riding Lawn Mower as possible and save money.

So far so good, but the brick wall has been the wheels. Actually, has been is more like it, because the solution has been there, just waiting in the wings.

See how the Go Kart Guru tackles the problem in the Go Kart Video series coming this fall...